Google+ How To Make a Blog Popular
How To Make A Blog Popular  
Contact Me
Showing posts with label Blogging Tips and Tricks. Show all posts

Thursday, July 08, 2010

Step by step process to take backup of a blog:

Sometimes we need to take backup of a blog. There are many reason to take backup of a blog. Suppose you want to move your blog to another blogging services or you want to take backup of it into your hard disk drive or may be you want to merge more blogs into one.  Here i am explaining you a step by step process to do so.

Taking Backup of a blog: 

Step 1: Login to your blogger a/c.

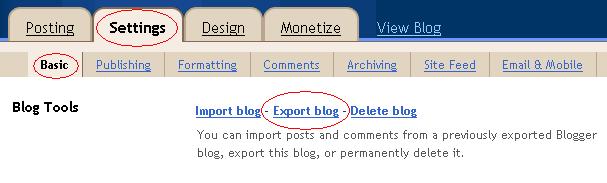
Step 2: To take backup of your blog click Settings tab | Basic tab | Export blog button.


Step 3: Now blogger asks to export your blog. Click Downlod Blog button.


Step 4: Now a window appears on the screen which asks users to save the .xml file to local hard disk. Press Ok button to save the .xml file.
By this way you can take backup of all of your blogs. This backup may be useful if you accedently delete some of your posts or If your blogger account has been banned then you can import this backup again by import blog button into your another blog.

Note : If you take backup of your blog, your blog will not be delete from blogger. It just gives you a .xml copy of that blog.

Monday, January 28, 2008

How to remove/delete unwanted comments from blogger's blog:

Commenting in a blog is a best facility but sometimes if we don't need particular comment then we can delete it easily by following step by step process.

step 1: log in to your blogger account.
step 2: Go to the dashboard.
step 3: Click Manage "Posts" from the dashboard, it will take you to your posts.
step 4: You may find comments link next to post title as shown in the picture.

step 5:Now click desired comments link this will take you before all the comments in the posts as shown in the picture below
step 6: Click the trash can button of desired comment, it will delete the comment that you no longer need.

Tuesday, October 16, 2007

How to add a header image in New Blogger’s Blog :

Now it is too simple to add a header image in new blogger’s blog: Follow these step by step process to do the job.

  1. Logon to your blogger account.
  2. Go to the dashboard
  3. Click “Layout” option of your blog.
  4. Page element page would be appeared on the screen. Click “Edit” link of blog header.
  5. Configure Header window would be appeared on the screen. There you may type Title of the blog, Blog Description, and add an image by browsing the image “from your computer” or “From the web” option and then click save the changes and view your blog.


Tuesday, August 07, 2007

Survey your visitors by adding poll to your blog :

This is the new feature added to blogger. You can add poll to your blog and survey your visitor. It is very easy process to do so.

Step 1: Log on to your blogger account.

Step 2: On dashboard click "Layout" option of your blog.

Step 3: Click "add page element" button.

Step 4: Click "Add to Blog" button of Poll option.

Step 5: "Create a Poll" window will be appeared on the screen. Type in your poll question there and answers too. you may also increase answers or you may decrease the answers by clicking "Remove" button. You may also allow users to select multiple answers.

How To Add Google Language Translator In Your Blog :

It is a widget that you can add into your blog and let your visitor convert your blog pages into ten different languages. Just suppose your blog is in English and visitor does not know English so using this language translator tool he may be able to read the blog in their language.
It supports ten languages like French, Korean, Russian, Japanese, Spanish, Italian, Arabic, German, Portuguese and Chinese.

This widget is available in three variety.

Normal Widget

Big Flags

Small Flags

Click the link above of your choice and get the code and copy paste it into your blogs template and you are done.

How to add a "Online User Counter" into a Blog / Website :

What is a "Online User Counter" :

Through this you can track that how many users are currently browsing your blog/website or you may see who is online currently. There are many free Online User Counter services available. You have to visit their site and copy the code and then paste it into your blog and you are done. Many of those sites asks you your blog/site address and give you the code to paste into your blog/site and many of them ask you to fill up a form to register to their sites. Here is a list of the links that you can visit and implement a Online Users Counter. It is very easy process to implement this.

www.myonlineusers.com

www.jstracker.com

www.freeonlineusers.com

www.tag-board.com/counter

www.usersonline.com

www.advancescripts.com/detailed/165.html

hosted-scripts.com/ou.php

www.usercounter.net

www.techwarelabs.com/community/archive/index.php/t-993.html

www.user-counter.com

www.easyonlineusers.com

www.whoisonline.net

www.usercounter.net/signup.php

www.counterservis.com

www.showusers.com

www.everycounter.com/htmlcode.php

www.fastonlineusers.com

Implementing Online Users Counter :

To implement Online User Counter just visit www.myonlineusers.com . Webpage gets open and then type in your blog/site address where you want online users counter and then click "Get code" button. Then simply copy and paste the code into your blog where you need online users counter. Don't modify the code otherwise code won't work correctly and sometimes it may violate the terms and conditions.


Thursday, May 10, 2007

How To Create A Hindi Blog on Blogger (Tutorial)

To Create A Hindi Blog first of all you have to create a blog on Blogger.

Creating a Blog on Blogger :

Step 1: Click here to read step by step process to create a blog if you don’t have one. If you already have a blog skip this step.

Configuring Windows XP PC To Take Unicode Hindi :

Step 2: Click Start > Control Panel.

Step 3: From Control Panel Open “Regional and Language Options” By Clicking on it.

Step 4: Regional and Language Options dialogue box will be appeared on the screen. Click “Language” tab.

Step 5: Check “Install files for complex script and right-to-left languages (including thai) Check box.

Step 6: A meesage box will be appeared on the screen, read the message and press “OK” button and then press “Apply” Button. System will ask to insert a Windows XP installation CD into CD-ROM drive and then press “OK” Button. Windows XP will install necessary files to hard disk and then reboot the machine.

Step 7: After rebooting the machine start Control Panel then click “Regional and Language Options”.

Step 8: click “Language Tab” and Click Details > Add button.

Step 9: Add Input Language Dialogue box will be appeared on the screen. Choose “Hindi” from Input Language drop down list box and then press “Ok” Button. It will add Hindi Language.

Step 10: Press “Ok” button to close all open windows.

Step 11: Now you may see Language Bar will be added to the taskbar as shown below.

Step 12: Now by clicking on language toolbar you can change the language, Choose “Hindi” from language toolbar to start writing Hindi in Windows XP machine. (Shortcut to switch between language is (Left Alt + Left Shift )

Step 13: Click on the language toolbar and choose “Show the language bar”, language toolbar will be shifted to top right portion of the desktop.

Step 14: Open any text editor and start typing in Hindi language. For this you must know the keyboard layout.
Monday, March 12, 2007

How to create a blog post/publish a post in Blogger -Tutorial

Here is a step by step procedure to create a blog post in Blogger.

Step 1: Go to blogger’s website and then sign in with your username and password if you already have a account on Blogger. If you don’t have a Blogger account then click here and read How to create an account on Blogger.

Step 2: When you logged in, it will take you to the Dashboard of Blogger. Where you can manage your blog post and also you can create a new blog post by clicking “New Post” button as shown in the following picture. Each and every blog have a different “New Post” button press the one according to your need.

Next screen would appear on the screen as shown the following picture.
Step 3: Type appropriate Title for the post in title text box and content for the blog post as shown below in the picture.

Step 4: Type in appropriate label for the post in Label for the post text box. Labels are very useful thing in Blogger. If we use labels in blog post then further we can create a category menu in the sidebar of the blog. To read details about labels and how to create a category menu click here.

Step 5: Now click “Publish” button to publish your blog post. A message would appear that “Your blog post published successfully” then click “View blog” button to view your blog.

Friday, March 02, 2007

Make/create a blog page by your mobile handset (Mobile Blogging)

Yes it is true you can do mobile blogging on Blogger.

Through which you can send text and photos through your mobile handset to go@blogger.com and they would automatically get posted into your new blog page. Isn’t it very nice. You must have a claim token to access more options there for mobile blogging. Claim token you will receive in your mobile phone. For more details login to blogger.com.

Thursday, March 01, 2007

Step by step process to create a blog in Blogger

Here I am going to show you that how to create a blog in Blogger. Thanks to Blogger which have given us a great facility to create a blog abosolutely free.

Step 1: Start your favorite web browser.
Step 2: Type in http://www.blogger.com/ in address bar of your browser.
Step 3: You will be taken to the Blogger’s home page.
Step 4: Scroll down a little bit then page will be shown like following picture.

You can create a blog easily and quickly in Blogger. There are three steps you have to do to create a blog.

Create an account
Name your Blog
Choose a template

Create an account:

Step 5: Now Click at “CREATE YOUR BLOG NOW”.
Step 6: You will be presented a first step to create a blog “Create a Google account”.
Step 7: If you already have a Gmail or Google Groups or Orkut account then first you have to signin by clicking at “Sign in First” link. Then you will be presented Google account signing in page. Sign in to Google account by typing in there your Id and Password.
Please Note : If you don’t have a Google account then skip the step 7.

Step 8: If you don’t have a Google account then you have to create one. For this you have to fill the form as shown above type in your Email address. You must have an email address then Enter a password and Retype your password. Your password must be at least 6 characters long. Password and Retype password must be same. Now type in your Display name. This name will be used as a signature of post. Type in Verification word in the given text box. Then read the terms of service by clicking “Terms Of Service” link. If you agree with the terms of service then check the “I accept terms of service” check box. Then click “Continue” button to continue the blog creation process.

Name your blog:
Step 9: Now you will be shown second step to create a blog that is Naming a blog. So you must think an appropriate a blog title and blog URL beforehand.
Just suppose blog name is “Unique Technology Blog” and blog address (URL) “unicomtech”. Type in there your Blog name and Blog URL and click “check availability” link. It is for just checking that somebody has already taken this URL or not.
If it is available then you can proceed further, and if is not then type in some other URL.
Step 10: If you want to host your blog somewhere else then Click “Advanced Blog Setup” link else click “Continue” to proceed further.

Choose Template:
Step 11: Now after clicking “Continue” button you will be presented third step to create a blog that “Choose a template” here you can choose a template for your blog from variety of template click “Preview template” link to preview your blog. If you choose a template from here then also you can change it later.
Step 12: Click “Continue button” and you are done. Your blog has been successfully created.

Step 13: Now click “Start Posting” button to write a first post for your blog. Write a title of post and body of post. You can also format your post by given formatting tools like bold, italic, underline, text color, size, font and alignment of the text then click “Publish” button to publish your first post. If successful message appears then you have successfully post your blog post. Now click “View blog” to view your blog. Happy blogging. If you face any difficulty in doing this you can email me.

Related Article:

Process to Create a Hindi Blog in Blogger

Tuesday, January 30, 2007

Check Google Page Rank Of your Web site/ Blog

Page Rank Checker is a free tool to check Google page ranking of any web site / Blog. To check Click Here and type in your website / blog address URL there.
(example http://nitinhindustani.blogspot.com) in PR checker box and then click “Check PR” button to see page rank.

How to create a category menu in Blog:

If you have labels in your blog posts and you are using New Blogger a/c so you can create a menu of labels or we may say that we can put list of labels in the sidebar of the blog. So readers may choose specific category from the list and read all of those articles, which are of the same category.

Creating a menu of labels:

To create a menu of labels and apply it to a sidebar of the blog, follow the given steps.

1. Login to the New Blogger a/c and then go to the ‘Dashboard’ and then click “Layout” button of your blog in which you want to create a menu.

It will take you to the “Add and arrange page elements” page.
Now click “Add a page element” button.


A window will be appeared on the screen. The window shows variety of elements that you can use in your page. In “Labels” option click “Add to Blog” button as shown below.


“Configure Labels” window will be appeared on the screen. Write in appropriate title for the labels and choose sorting style either you want to see all of your labels


alphabetically or by frequency and then click “Save Changes” button and you are done.
Now click “View Blog” button to view your blog with category list in the sidebar.

Now you have successfully created a category menu in the sidebar of your blog.

Sunday, January 28, 2007

Label Your Post

What can you do by using labels?
Labeling a post is very good feature of Blogger. By using label feature in new Blogger you can label your each and every post you post. If you write articles on different subjects so by using label feature in blogger you can create category menu in sidebar of a blog. So visitors may see all of the topics on which you have written till now. Category menu is shown in the following picture.


When viewing a blog by clicking any of the label will take you to those post containing the same labels. So you can see all of the post at the same page with the same category or inshort we can say same category post will be displayed at the same page.


How To Label Your Post?
You can label your post by following given steps.

1. Logon to your Blogger account then go to 'Dashboard'.
2. Click 'New Post' to create a new post then write your post. When you write your post you may see “Label for this post” at the bottom right corner of the post window. Type in there your labels according to your post. Just suppose if you are writing about computer. Label your post by writing “computer” there.

Things to remember when you use labels:
If you have more then one labels to write. Separate each of them with a comma. You can not used these characters in labels &,<,>,@,! Etc. So avoid use of them.

Showing/Hiding All Labels:
Bottom of the post windows contains ‘Show all’ button by clicking on it will show all the labels, which you have used till now. When you click the same button, the button will be converted in ‘Hide All’. So by pressing ‘Hide All’ button All the labels will be hidden. Things would become clearer to you when you see the following picture.


Following picture shows use of labels.


4. Publish your post by clicking ‘Publish’ button. Then view your blog by clicking ‘View Blog’ tab.
When you view your blog, you may see labels as the following picture shows.

Friday, January 19, 2007

Google Page Rank

PageRanking is a function of Google that measures the quality of a website on a scale of 0 to10. Higher the Quality of your site Higher the Page Rank would be. To improve PageRank of your site or blog, you have to improve traffic towards your website/blog.
For that start exchaging links, Submit your blogs to blog directories and put comments on other's sites and leave your URL there. Your comment must be appropriate and related to content. Avoid comments like "Nice post.....", "Great..........", "Very Good........", "Excellent........". Try to comment as good as you can. Your comment must be descriptive.

Saturday, December 23, 2006

Check Link Popularity Of Your Blog/Website

Link Popularity :

You can check link popularity of your blog and find out that how many links of your blog in other's blog. Increase your link by exchanging links by others. If a blog has a higher link popularity then the blog will be rank high in search engines and get a very good traffic towards the blog. So try to increase the link popularity and make a blog/website more popular.

Check Link Popularity :

Here is the tool to check link popularity of your blog. Higher the number, Higher the link popularity.

Click Here and check the link popularity